
Joining Microsoft Teams Meetings from a Browser Without a Commercial Microsoft Work or School Account
In this post: Meeting Prep | In the Meeting | Troubleshooting Issues | Asking for Help
Many government clients and job seekers do not have access to a Commercial/Industry Microsoft Work or School account. This can be challenging for individuals who are looking to join webinars, training events, and facilitated meetings in Microsoft Teams.
Most of the people that we interact with in our work at Franklin IQ have Microsoft Accounts that can be classified one of three ways: personal accounts, commercial/industry work or school accounts, and government accounts.
You might have a Personal Microsoft Account if you signed up for 365 for home, if you’re a standard PC user, or if you use an Xbox console to play video games.
You might have a commercial/industry Office 365 Work or School account if your employer or school uses Microsoft infrastructure.
Finally, you might have an Office 365 for Government if you work for a qualified government entity in some capacity. The Government Office 365 environment is partially or completely insulated from the industry Teams environment and can be siloed even further based on agency and the “Impact Levels” set forth by the Federal Risk and Authorization Management Program (FedRAMP) and the Defense Information Systems Agency (DISA) for the Department of Defense (DOD) as a part of their enterprise-wide cloud computing initiative.
If you HAVE a commercial/industry work or school account and you get invited to a Teams meeting by another organization, then your meeting will typically be fairly seamless. Depending on the group policies (or IT regulations) at your organization, you might find that you have some limitations, but your experience should be fairly consistent with what you do in Teams every day.
If you DO NOT have a commercial/industry work or school account, then there are some specific challenges that you will need to address prior to joining.
Take 15-30 minutes to prepare before the meeting
DON’T Just Click the link to join!
This is especially important for users that have an Office 365 for Government account. As of July 2022, we have found that many Government users, particularly those on the higher Impact Levels, are unable to simply click a link in an email to join. Teams has a great deal of difficulty negotiating the guest access natively in the application and users find that they are unable to connect or that their meeting experience is hindered. The limitations and glitches that arise from joining via clicking the link can be incredibly disruptive and greatly diminish participation or prevent joining completely. This can be frustrating for both guest users and facilitators.
Setup Instructions
⬇ Keep reading or Jump to: top ⬆ of post | MEETING PREP | IN THE MEETING | TROUBLESHOOTING ISSUES | ASKING FOR HELP
1. Make Sure Your Technology is Supported
To join a Microsoft Teams meeting, you need a personal computer that supports the latest versions of Microsoft Edge or Google Chrome, or a personal tablet/mobile device that has the ability to download the Teams application. For the purposes of this post, we will be reviewing how to do this from a desktop or laptop computer.
Microsoft currently supports their Edge browser and Google Chrome for Teams meetings on the web.
As the experience can vary greatly based on your operating system and group policies set by your IT department, we would strongly recommend having both browsers downloaded and available.
⬇ Keep reading, or jump to top ⬆ of the post or basic setup instructions.
2. Get Updated
Check to make sure that your supported browsers (Edge and Chrome) are updated by checking the “About” page in the settings menu of each browser. Type edge://settings/help or chrome://settings/help into the address bar of your browser to get there quickly!
Make sure that your computer and Operating System are up to date. If you are using a personal device, follow the manufacturer and Operating System provider instructions for processing updates to your hardware, firmware, and software.
Your computer, tablet, or mobile device might prompt you to restart a program or the entire machine during the course of updates. If it does, please do so when you are prompted!
If you are using a device that is managed by an organization, please contact your IT help desk for assistance.
3. Reboot Your Machine
Whether your computer prompted you to reboot during updates or not, after you have finished updating everything, we recommend fully and properly shutting down your computer. Practically, this is a bit like finally taking all of the sticky notes, reminders, scraps of paper, and miscilleany off your desk so that you can start with a clean slate. Functionally, this clears your computer’s Random Access Memory (or RAM). This helps your computer to close any processes or applications that might be stuck or unnecessarily running in the background and convert any of it’s short-term memory to long-term memory.
⬇ Keep reading, go to the top ⬆ of the post or go back to the basic setup instructions.
4. Close Everything & Log Out
At one time or another, we have all been guilty of being distracted during a virtual event. Closing down all of the browser tabs and applications that you will not be using certainly helps to minimize any distractions, but it also serves a practical purpose. Virtual events take up a lot of your computer’s finite processing power and internet bandwidth. Every application window, browser tab, and email that you have open in the background siphons a bit more of that processing power and bandwidth away while also dramatically increasing the likelihood of experiencing a glitch or error during the event.
On a PC, open up Task Manager by pressing the Control, Shift, and Escape buttons at the same time.
On a Mac, open the Force Quit Applications Window by pressing Command, Option, and Escape buttons at the same time.
This is especially important for users that have an Office 365 for Government account. If there is a Government version of the Teams application running in the background during the meeting, or if you are logged into your Microsoft account in a browser, it exponentially increases the likelihood of experiencing a glitch or error during the event.
⬇ Keep reading, or jump to top ⬆ of the post or basic setup instructions.
5. Clear Your Browser's Cache & Cookies
The cache is another place on your computer where data gets temporarily stored and cookies are small pieces of data used to track user logins, data, and history. Clearing these out periodically is another great way to help your computer run more efficiently.
This step is especially important for users that have an Office 365 for Government account. Clearing your cache and cookies will prevent your computer from automatically trying to log back into your more secured Microsoft account.
-
Your computer’s cache is a bit like a junk drawer in your house. You find something that might be handy and you tuck that away for safekeeping. You might bring it out and use it every so often, you might update or replace it every so often, but you always tuck it away in the same place. Eventually, that junk drawer starts to overflow and you need to clean it out. I don’t know about you, but my first step in cleaning out a drawer is to dump it out. Some things might go back in after I’ve looked at them more carefully, but a lot of things will either get put away properly or will find their way to the recycling or trash bin. It’s the same on your computer!
-
-
Here is a quick walkthrough of how to do this now (July 2022).
Type edge://settings/clearBrowserData into your Edge address bar and click enter.
Set the time range to clear data for “All Time.”
Make sure that browsing history, download history, cookies and other site data, and cached images & files ARE SELECTED (indicated by a check mark).
Make sure that passwords, autofill form data (includes forms and cards) site permissions, all data from the previous version of Microsoft Edge, and Media foundation ARE NOT SELECTED (indicated by a blank box).
Scroll up and down to make sure that you have selected and de-selected the correct boxes.
Click the blue “Clear Now” button.
Clear-my-cache.com is an amazing resource that will give you up-to-date instructions on how to clear the cache and cookies from your computer if these instructions fall out of date.
-
Here is a quick walkthrough of how to do this now (July 2022).
Type chrome://settings/clearBrowserData into your Chrome address bar and click enter.
Select “Advanced” from the top of the window.
Set the time range to clear data for “All Time.”
Make sure that browsing history, download history, cookies and other site data, and cached images & files ARE SELECTED (indicated by a check mark).
Make sure that passwords, autofill form data (includes forms and cards) site permissions, all data from the previous version of Microsoft Edge, and Media foundation ARE NOT SELECTED (indicated by a blank box).
Scroll up and down to make sure that you have selected and de-selected the correct boxes.
Click the blue “Clear data” button.
Clear-my-cache.com is an amazing resource that will give you up-to-date instructions on how to clear the cache and cookies from your computer if these instructions fall out of date.
⬇ Keep reading, or jump to top ⬆ of the post or basic setup instructions.
6. Open a Private Browsing Window
Savvy marketers and developers want to help make your connections online seamless by leveraging your computer’s cache and using IP tracking technology like cookies. That’s why you see an ad for a product that you were just looking for on another device.
Private browsing windows keep you anonymous while you are online. A private browser does not use the stored cache on your device and does not store cookies outside of your session (scroll up to learn about cache and cookies). While that anonymity is not complete, what it can do is help users to hide their other account from Microsoft when trying to join a Teams meeting as a guest.
If you have an Office 365 for Government account, or if you regularly encounter errors when trying to join teams meetings at outside organizations, this is especially helpful. A Private browsing window can help provide another layer of reassurance that your other Microsoft account is not logged in and will not disturb the connection.
You can open an InPrivate window in different ways:
Select and hold (right-click) the Microsoft Edge logo in the taskbar and select New InPrivate window.
In Microsoft Edge, select and hold (right-click) a link and select Open link in InPrivate window.
In Microsoft Edge, select Settings and more > New InPrivate window.
On your computer, open Chrome.
At the top right, click More New Incognito Window.
A new window appears. In the top corner, check for the Incognito icon .
You can also use a keyboard shortcut to open an Incognito window:
Windows, Linux, or Chrome OS: Press Ctrl + Shift + n.
Mac: Press ⌘ + Shift + n.
⬇ Keep reading, or jump to top ⬆ of the post or basic setup instructions.
7. Copy your meeting link and paste it into your private browsing window
Right-click (or press and hold) the hyperlink from your email, then select the option that says “copy the link address”.
Then right-click (or press and hold) then select the option that says “paste” (or press control, shift, V).
Press enter or the button that confirms your input.
⬇ Keep reading, or jump to top ⬆ of the post or basic setup instructions.
8. Tell Your Browser NOT to Open Teams
Your browsing window will ask you at least twice if you would like to open this link in the Teams application. See the examples below.
Microsoft Edge
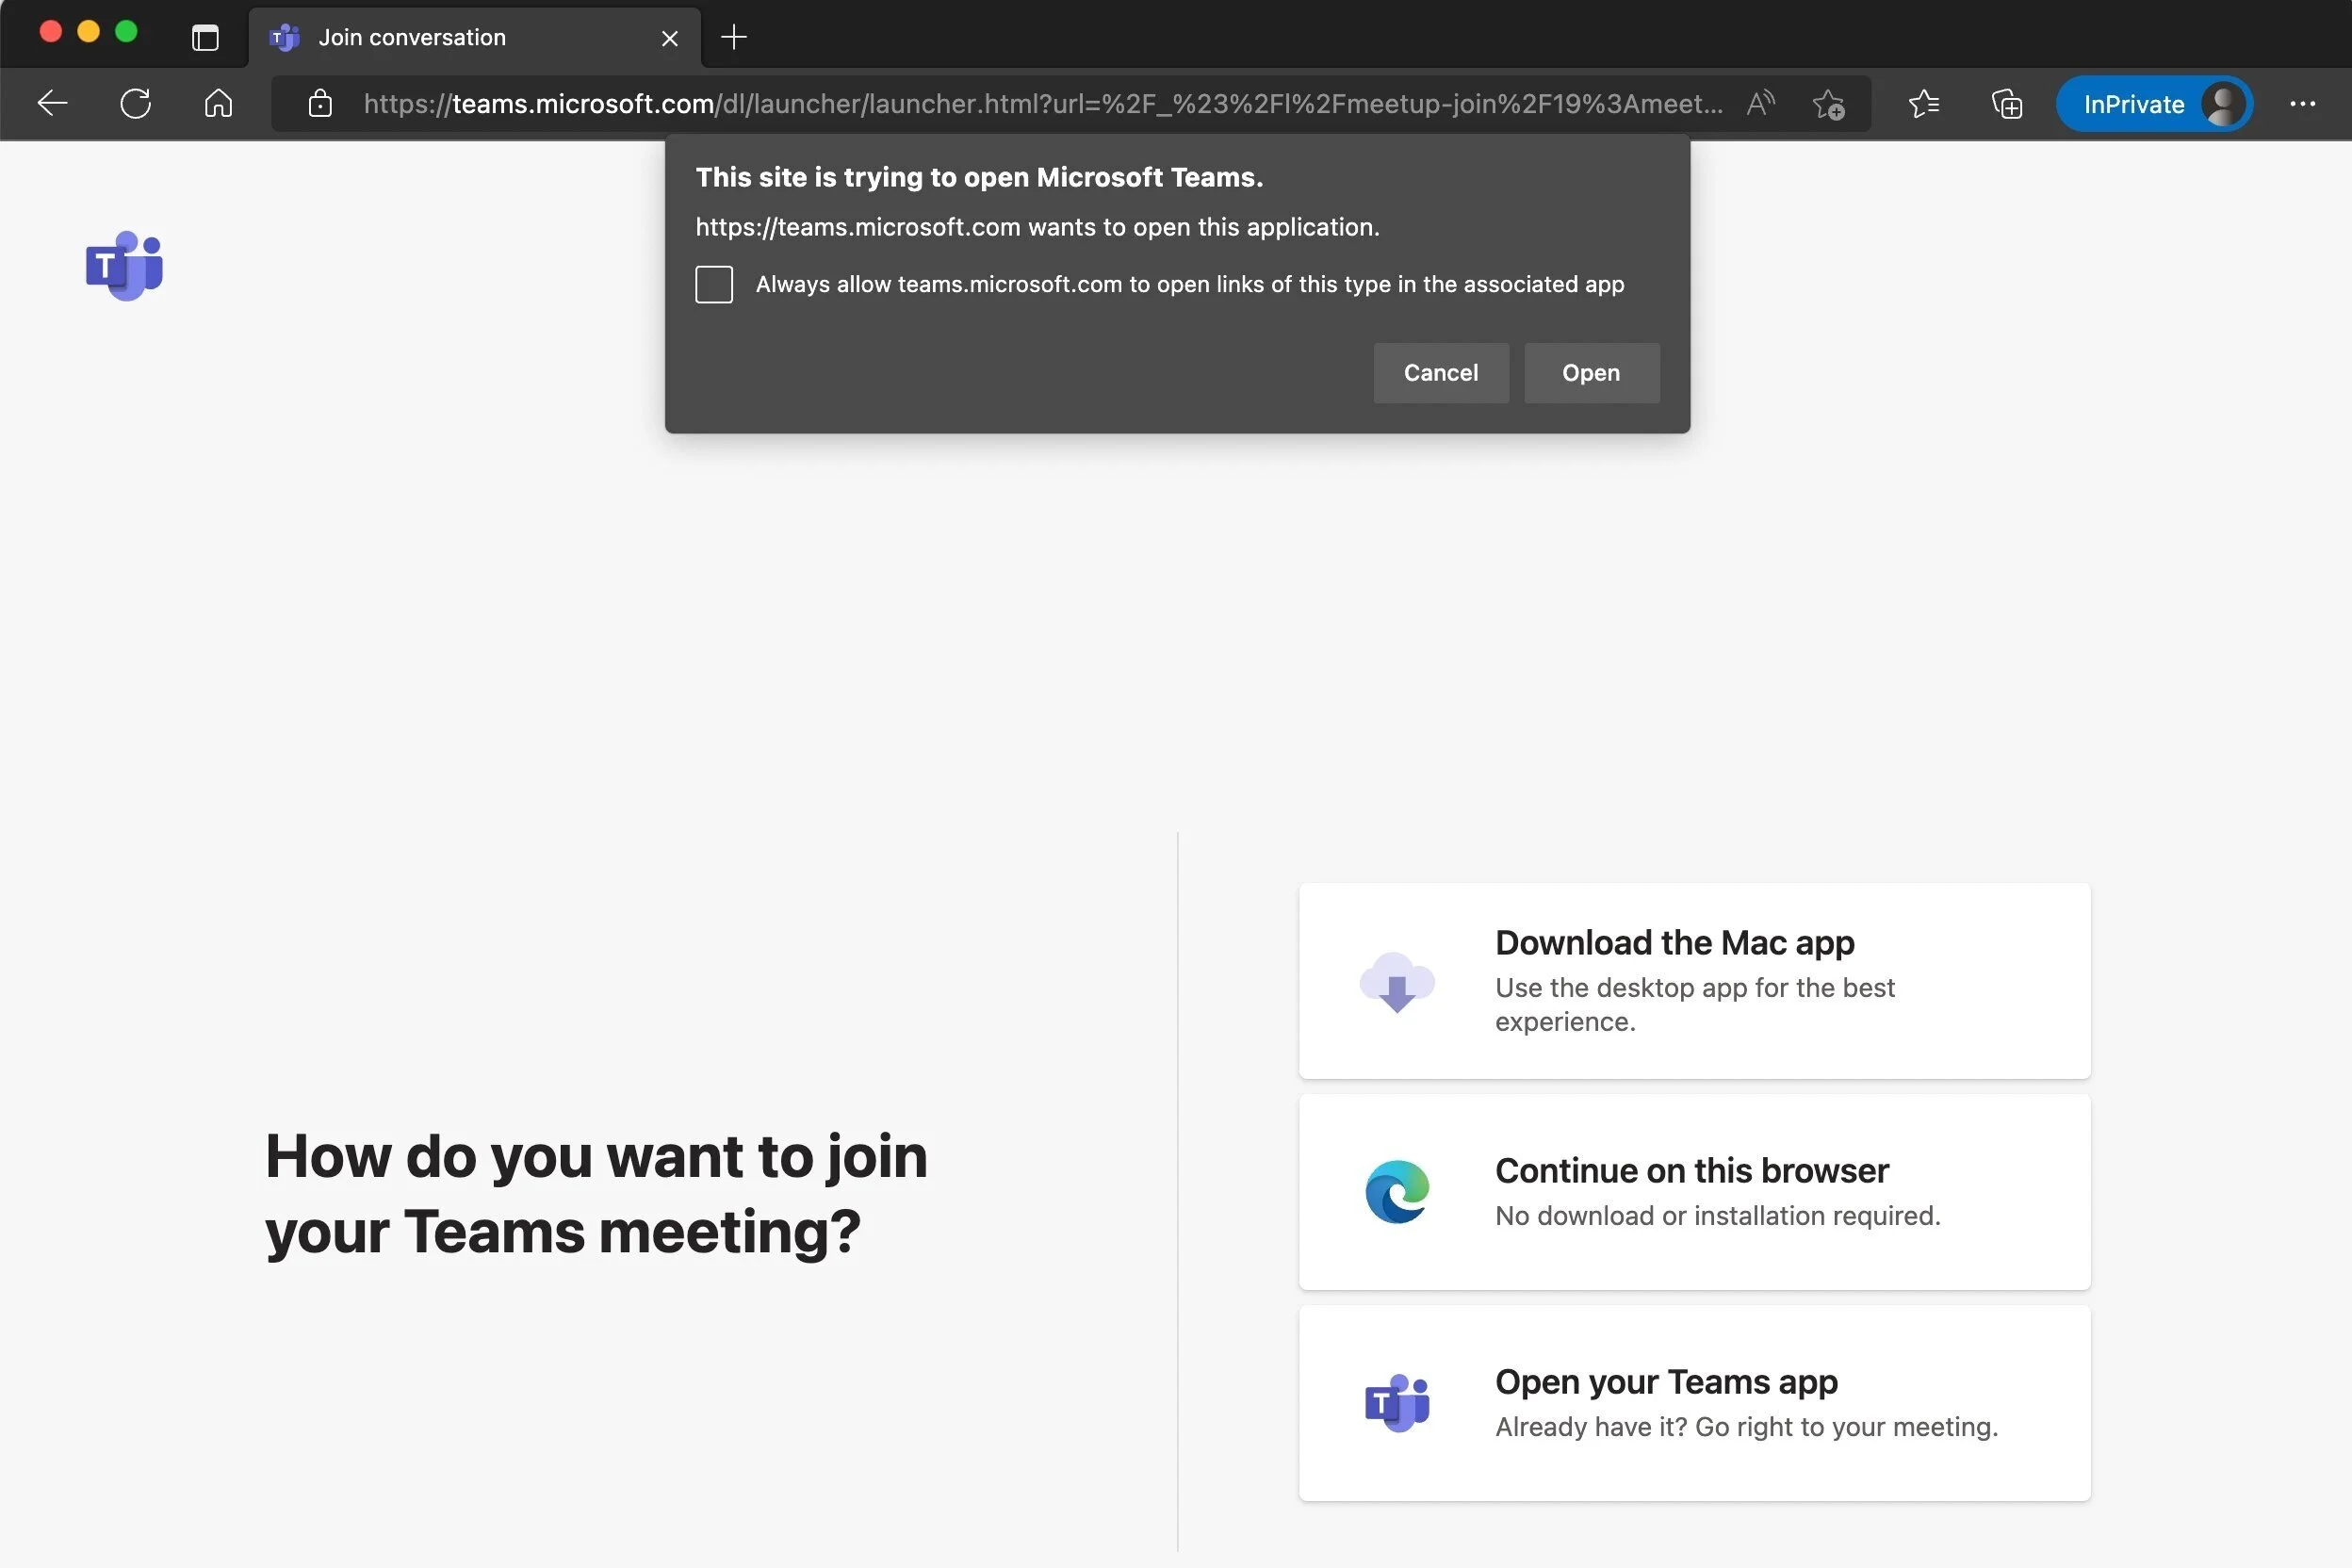
Microsoft Edge 1: How do you want to join?
Google Chrome
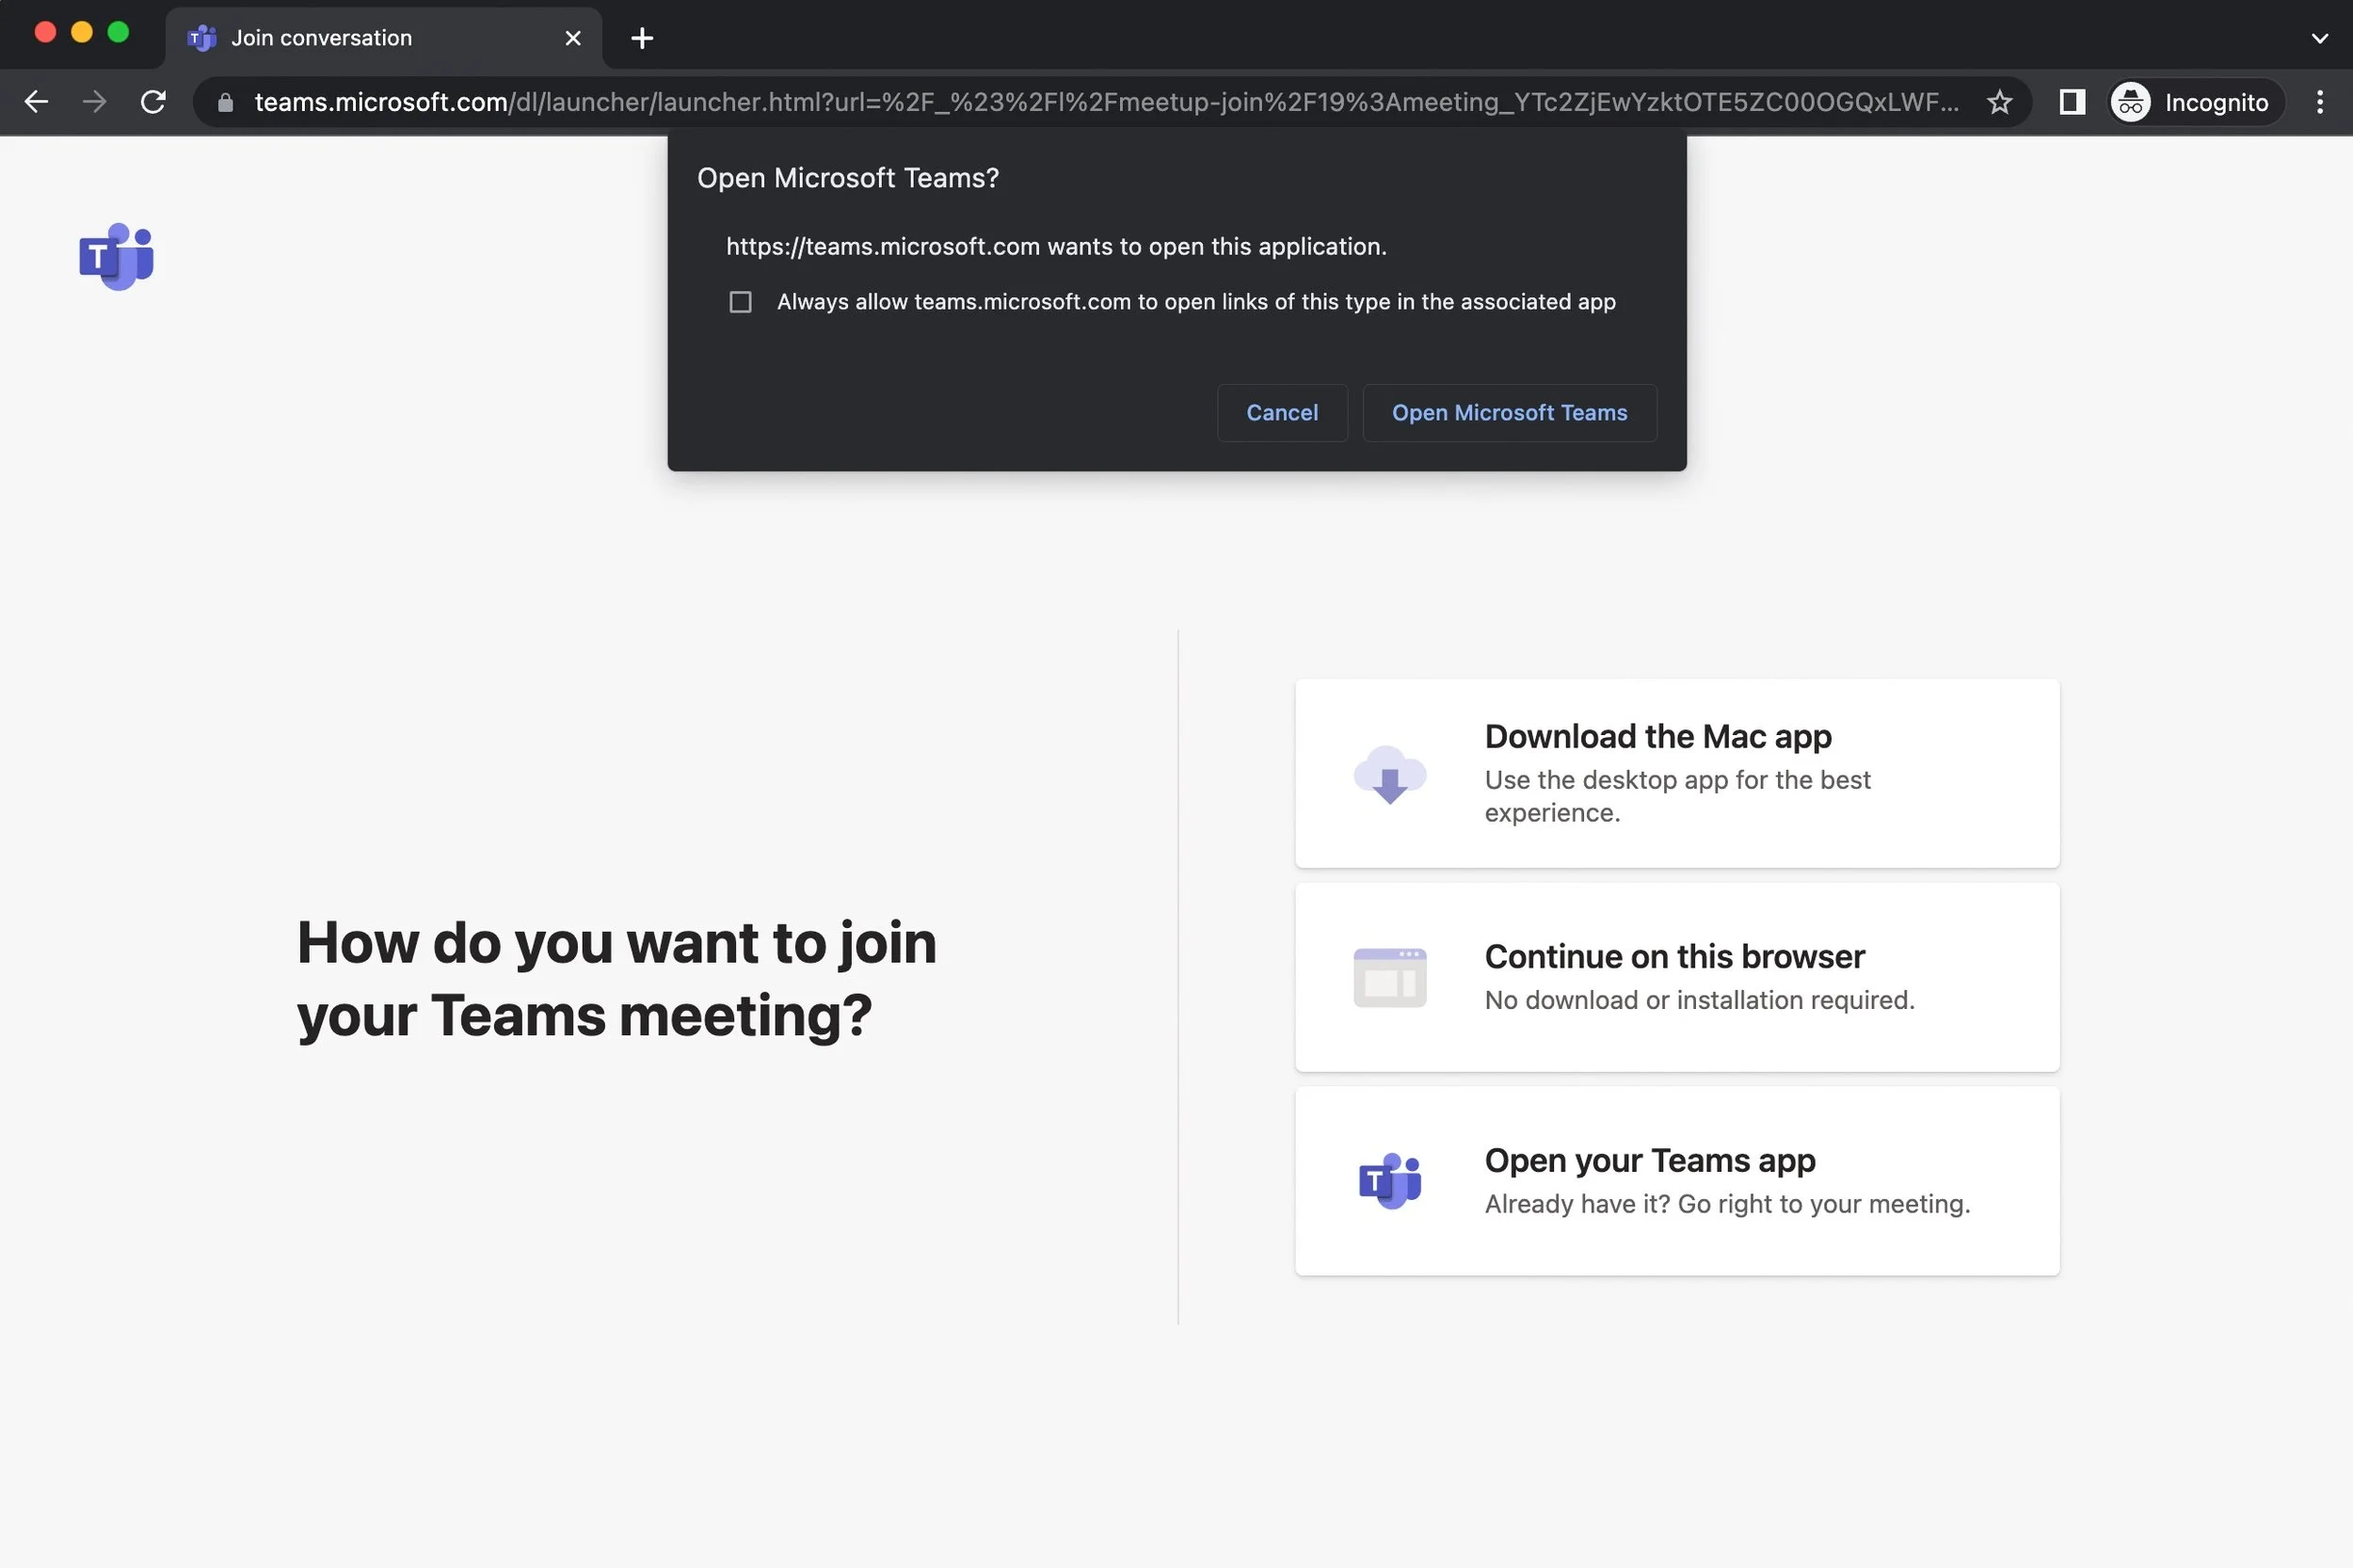
Google Chrome 1: How do you want to join?
As of July 2022, both browsers open a Lightbox informing you that the site would like to open the Teams application on your computer. In both instances, click cancel.
On the right side of the screen there are three buttons (as seen above), in both browsers, you want to select the middle option to “Continue on this browser.”
⬇ Keep reading, or jump to top ⬆ of the post or basic setup instructions.
9. Set Up Your Devices in the Browser
If your organizational group policy or administrative permissions allow, please “allow” the browser to use your microphone and camera. This will help you to fully engage and participate in the event.
Microsoft Edge
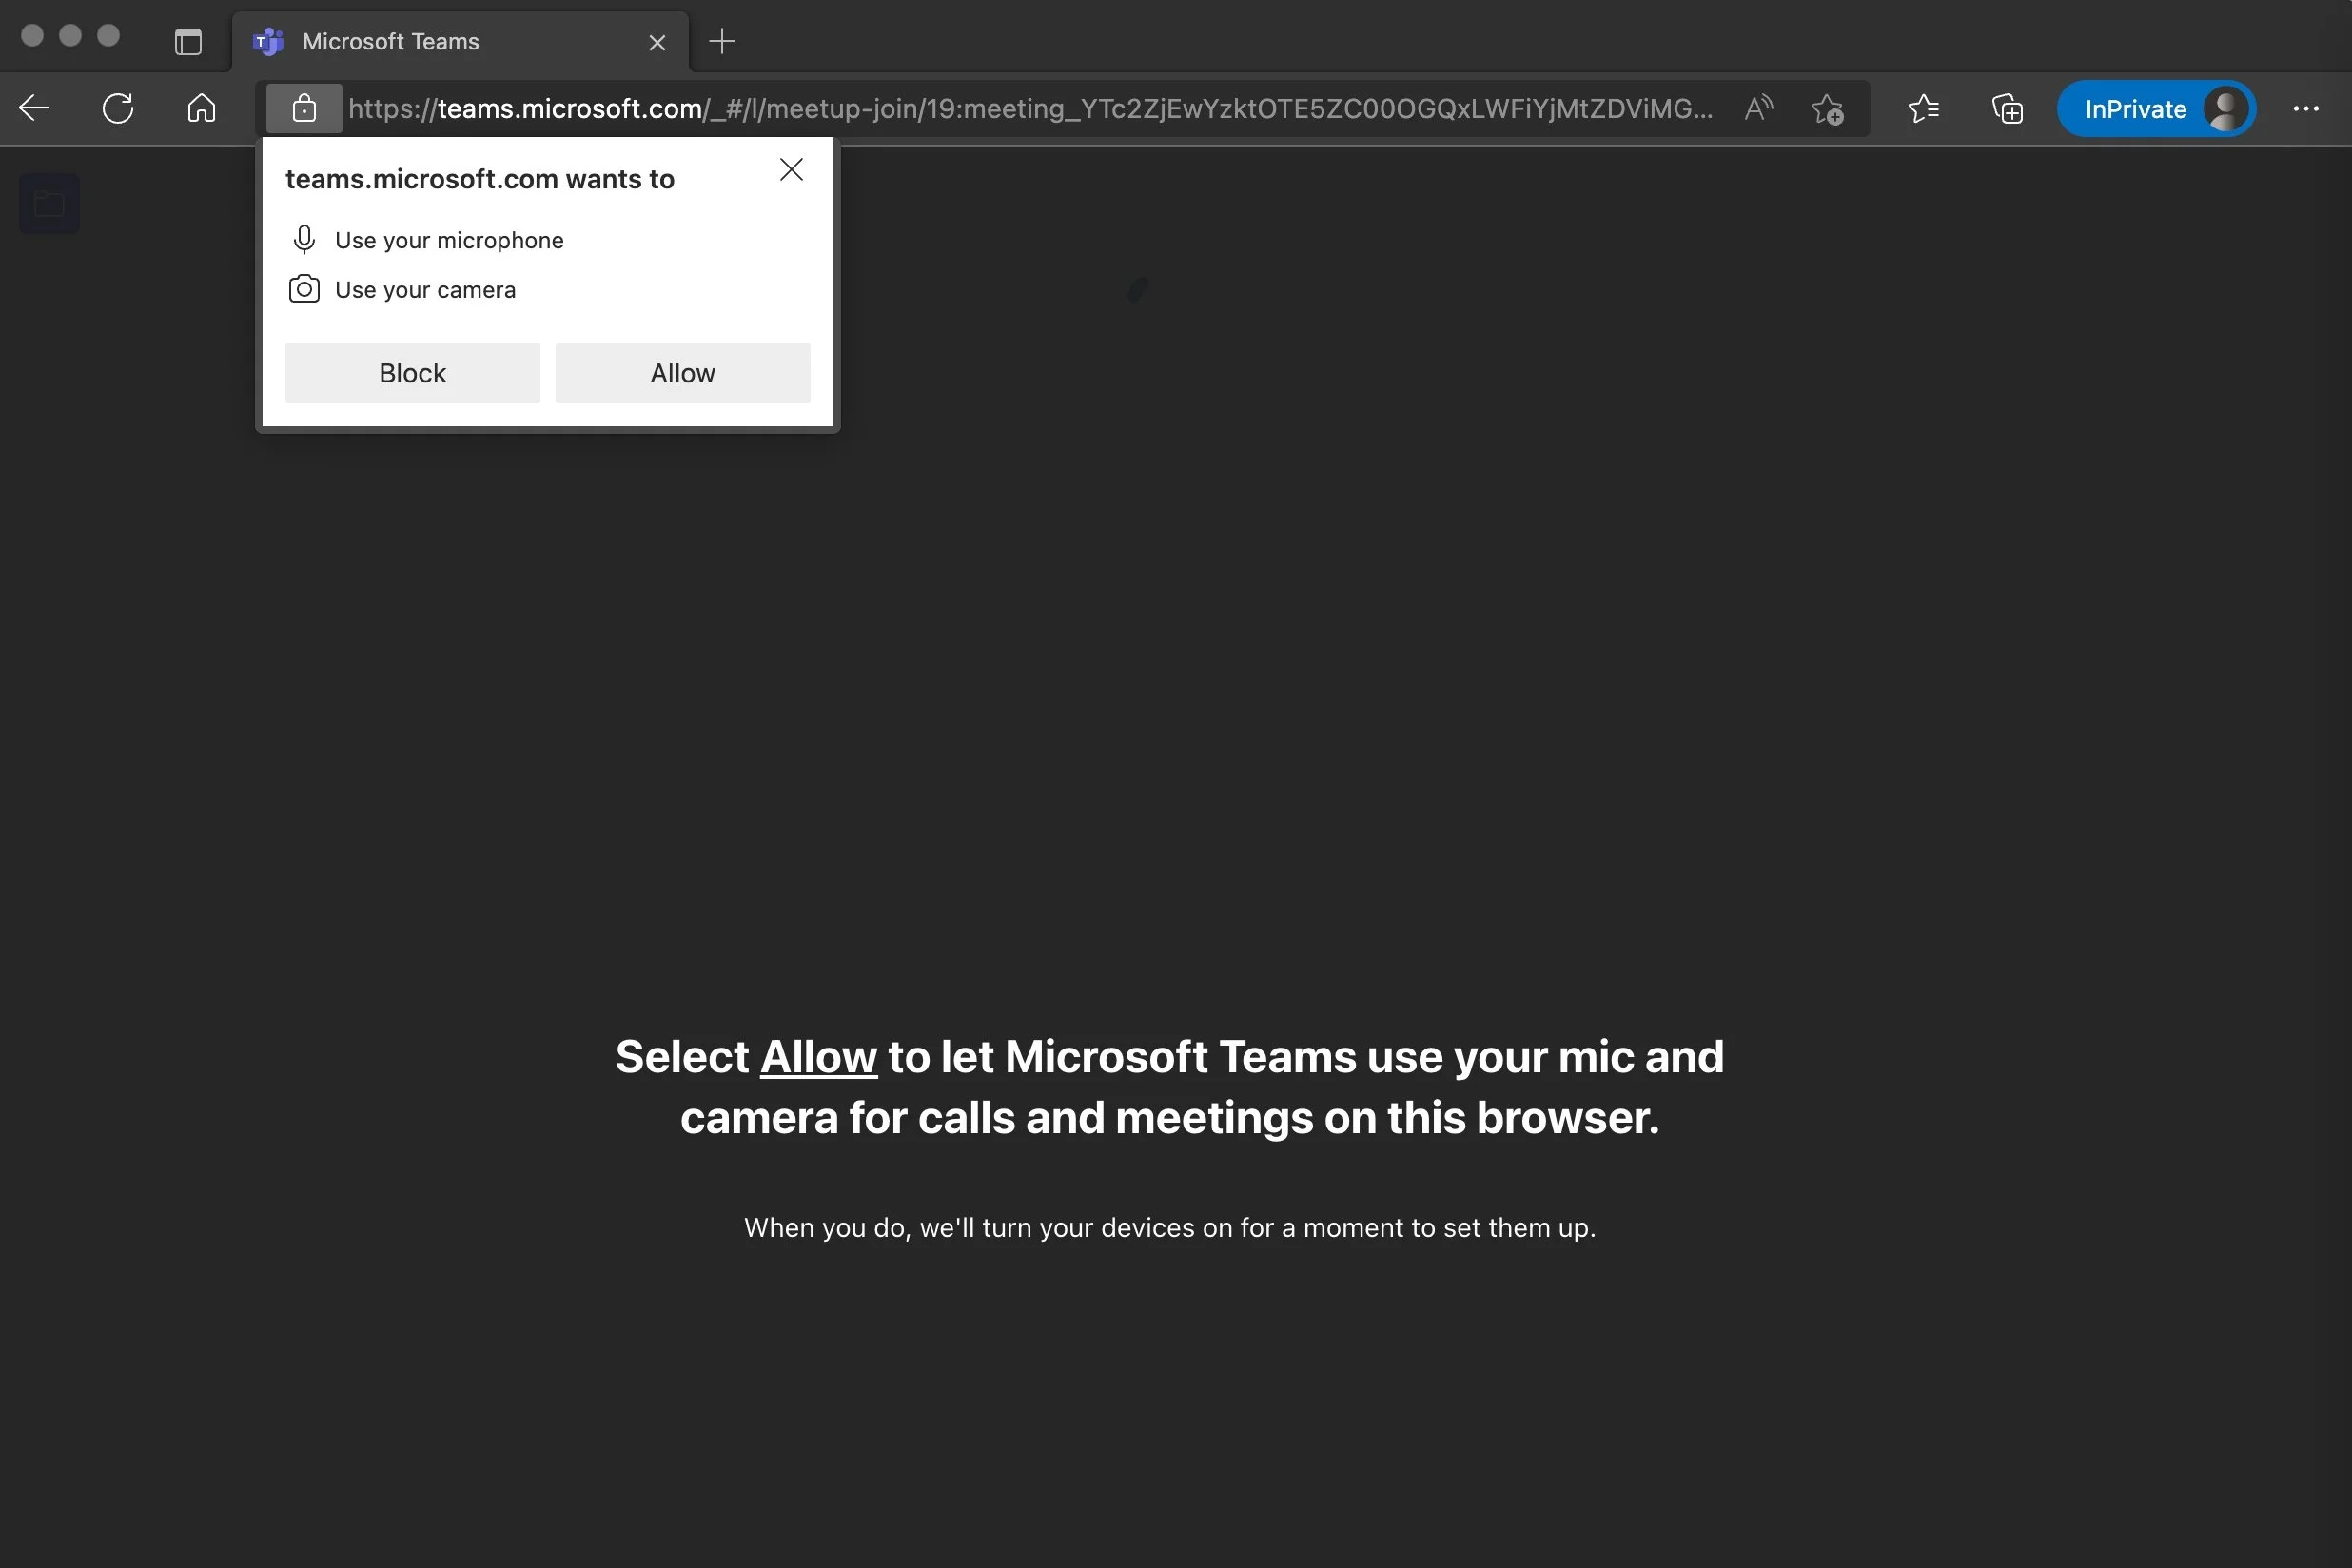
Microsoft Edge 2: Browser prompts you to allow Teams to use your microphone and camera.
Google Chrome
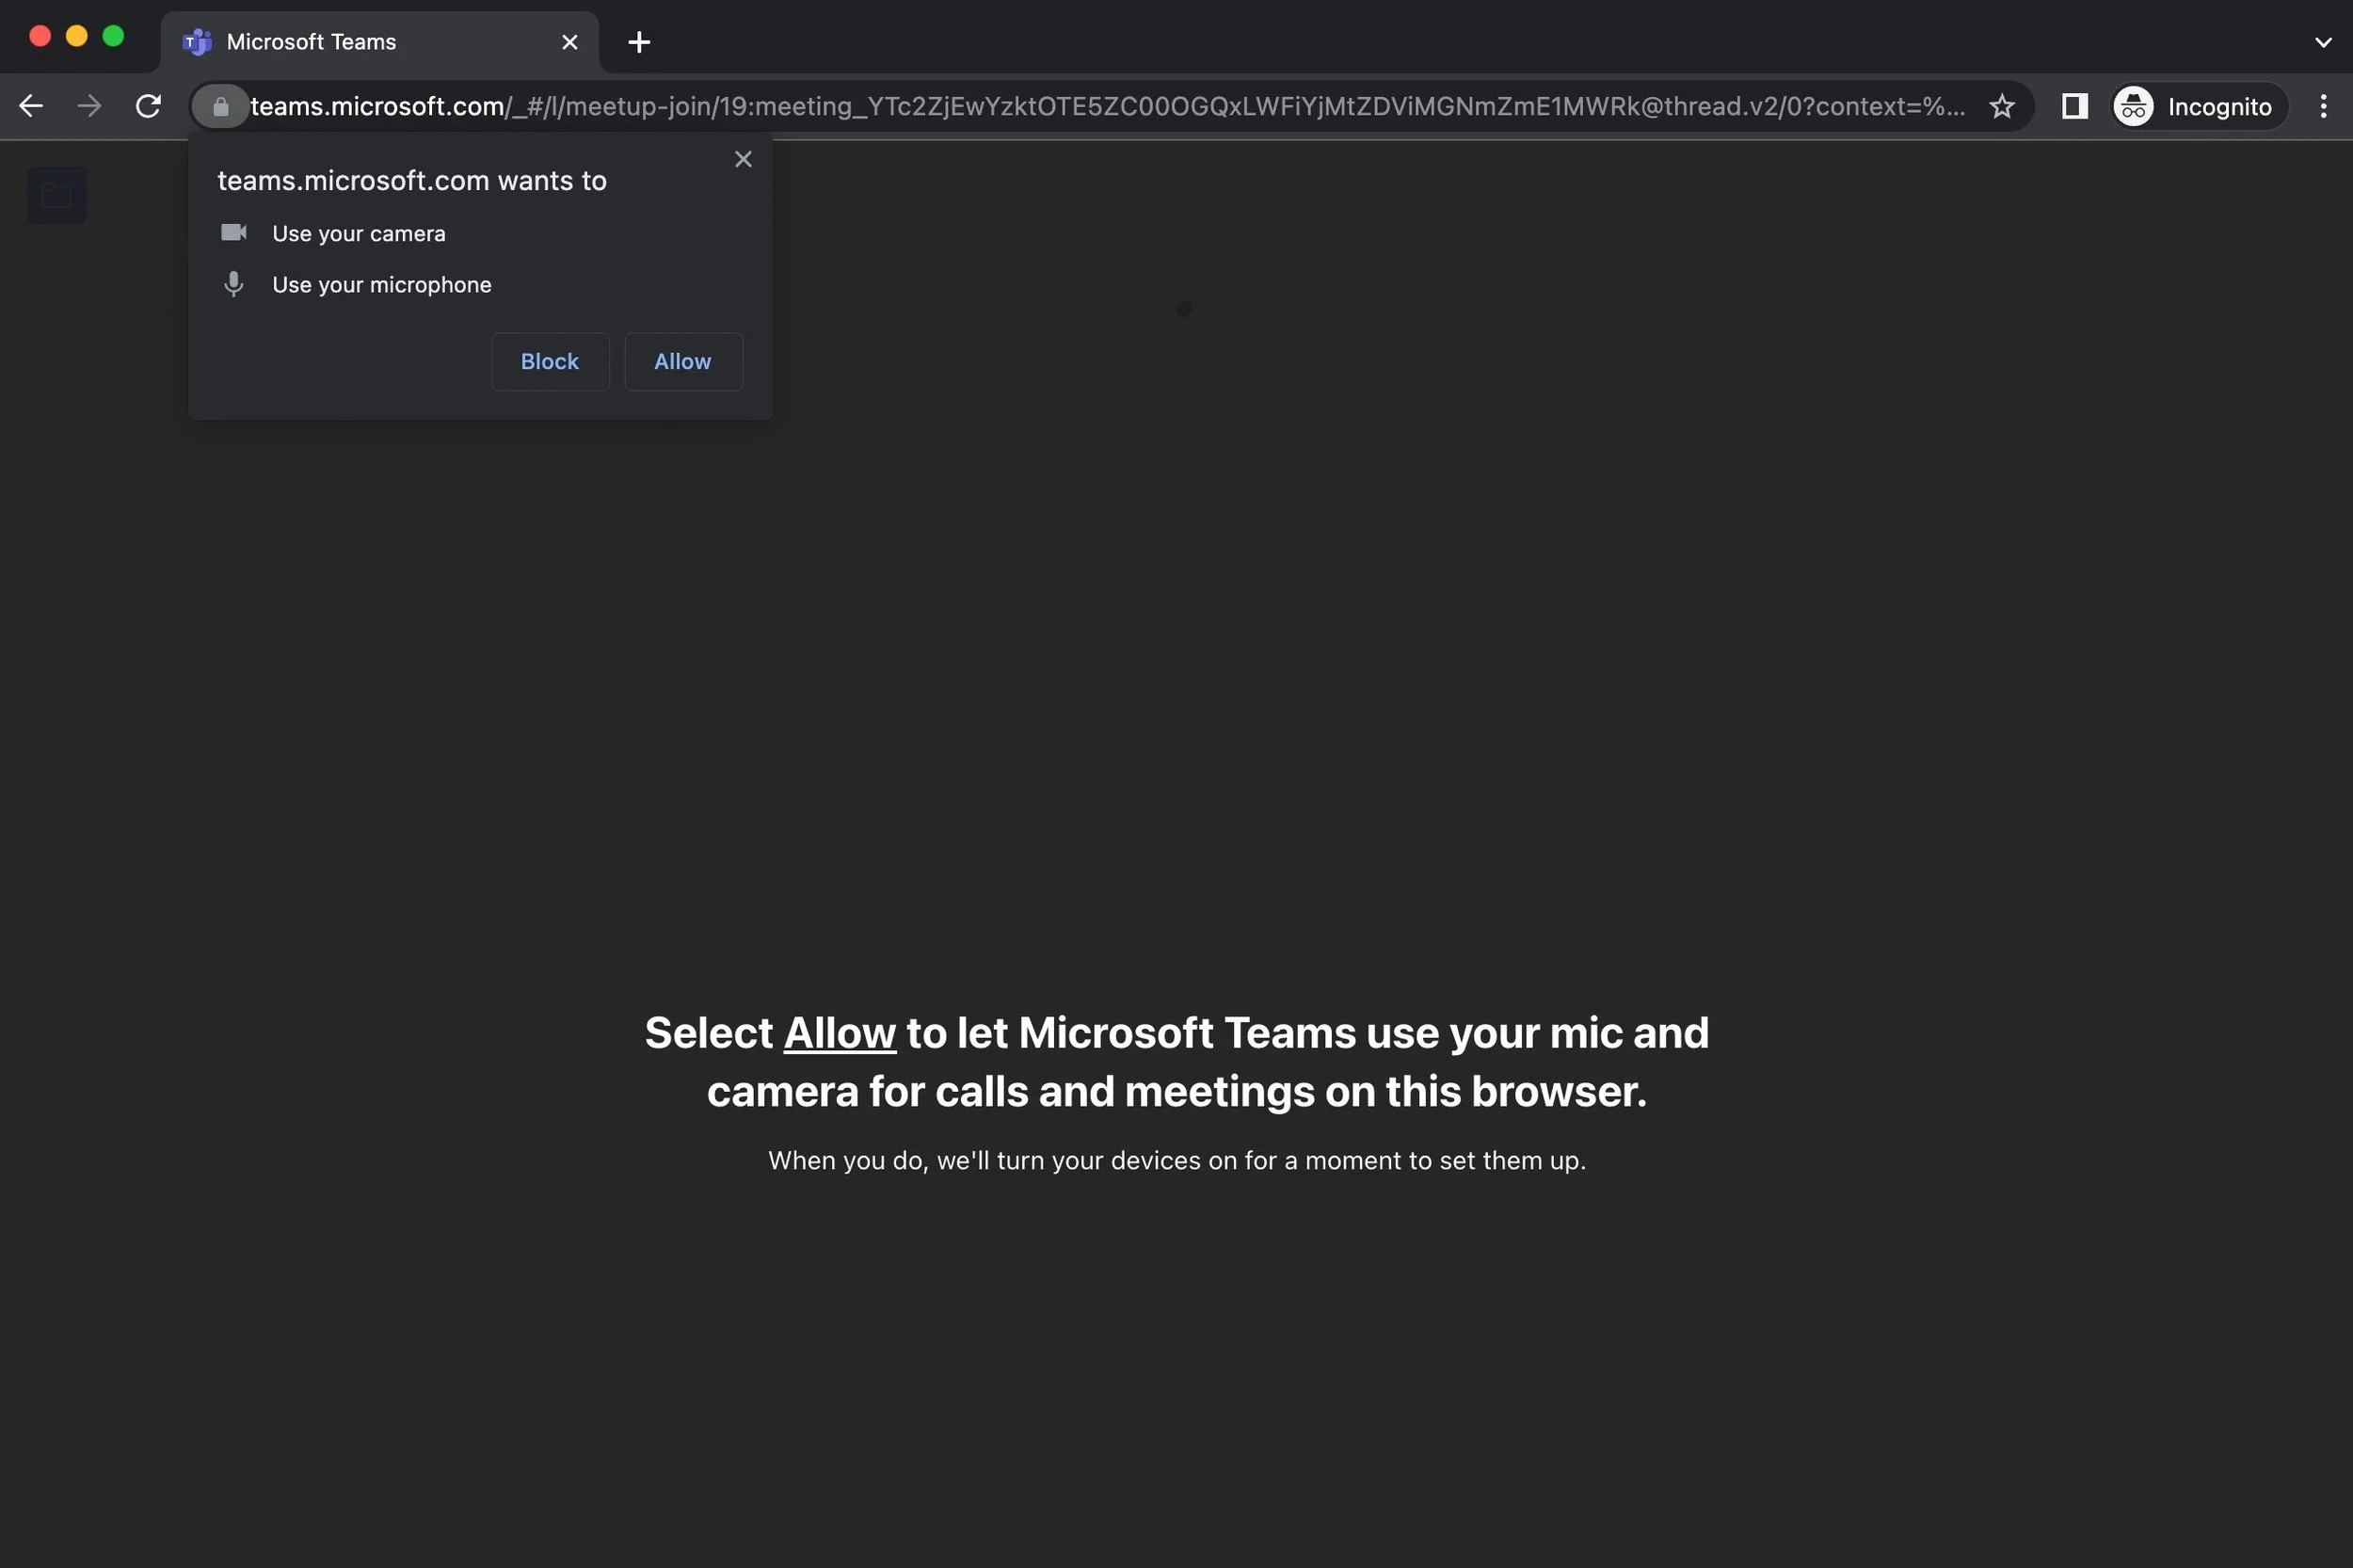
Google Chrome 2: Browser prompts you to allow Teams to use your microphone and camera.
At this stage, many users will click the “block” button out of habit or fear. While that is an excellent safe browsing habit, it will prevent you from being seen in the meeting or speaking. We can fix that on the next page.
Microsoft Edge
Microsoft Edge 3: Browser device setup.
Google Chrome
Google Chrome 3: Browser device setup.
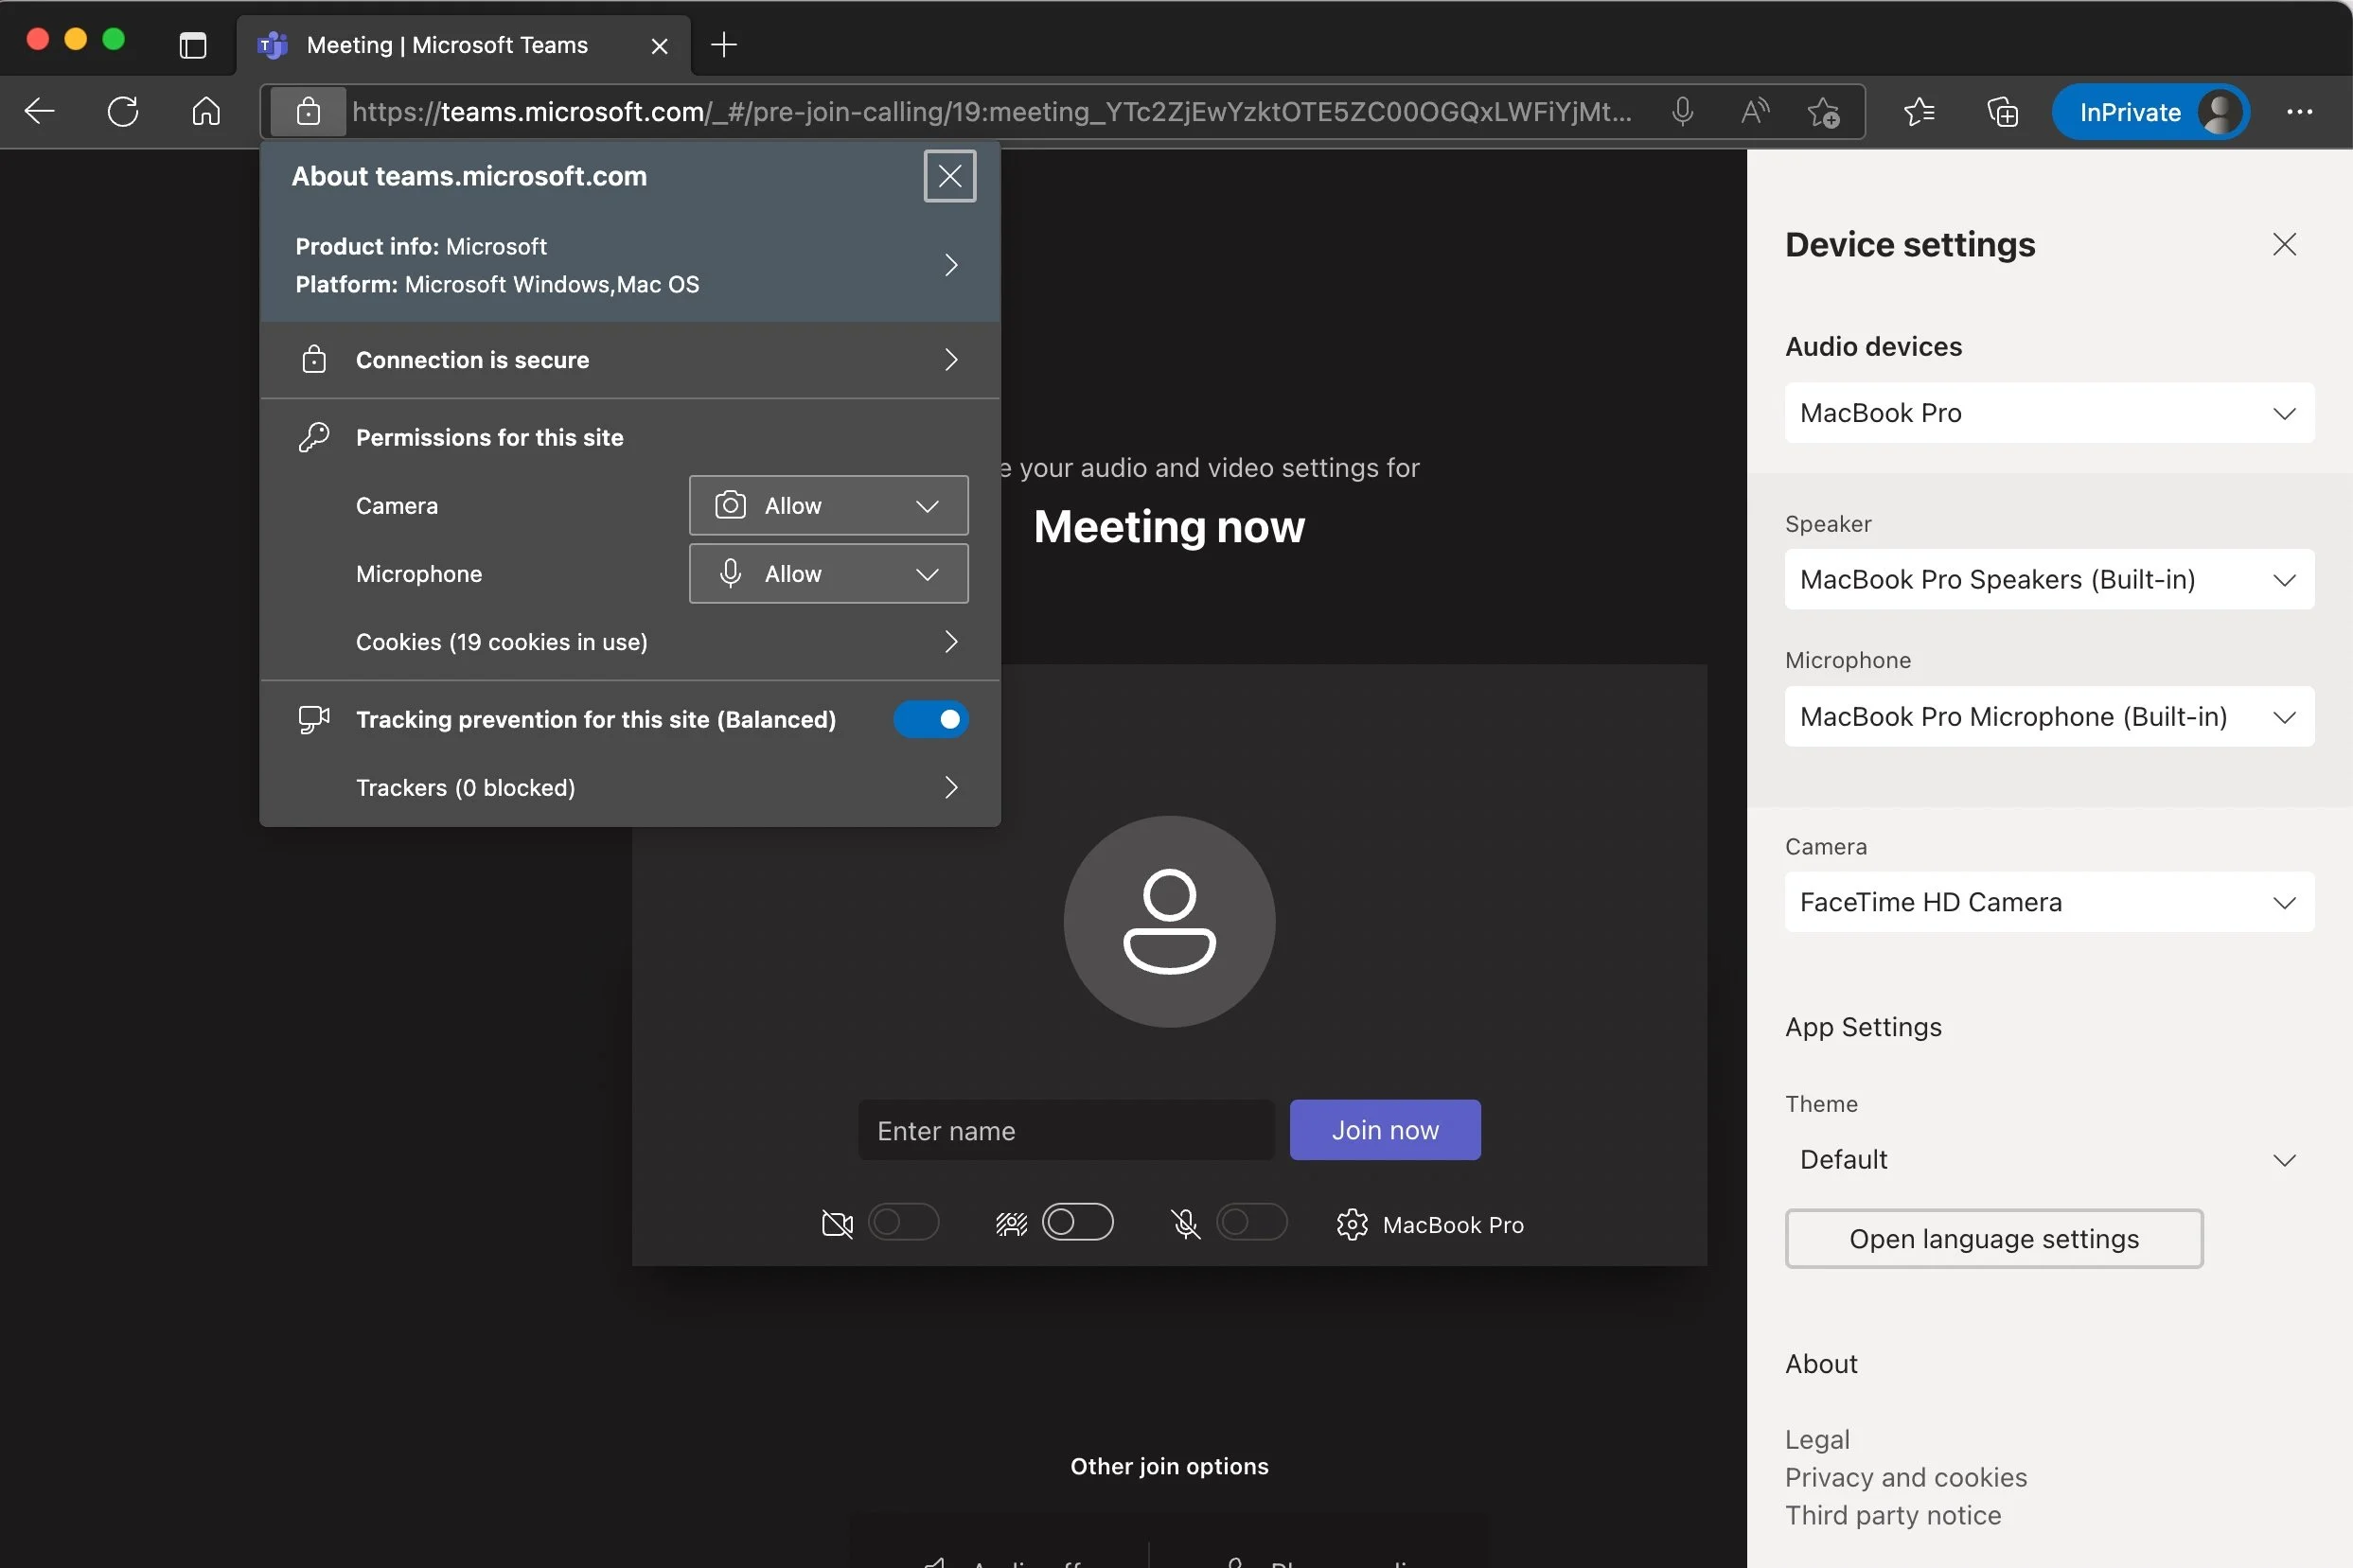
Enter your name in the text box but before you click join:
Double check your device settings. Click the gear below the purple join now button. This will help minimize issues when you get into the virtual room. Make sure your correct audio devices, speaker, microphone, and camera are selected.
Check yourself out! Toggle on your camera to confirm that both you and your space look the way you want to your colleagues. Make sure that your background is free of things that you do not want to show on camera. Move around a bit to make sure that if you shift during the meeting, that nothing you wouldn’t want to show is showing. You can also toggle on background effects on this screen by clicking the middle button.
If you clicked “block” instead of “allow” in the Lightbox on the last screen, fix it before you go into the virtual meeting room. Click the padlock button on the left side of the browser bar (shown above) to ensure that your browser has been given permission to use your camera and microphone.
10. Click Join!
You made it! Enjoy your event!
Jump back to the basic setup instructions.
⬇ Keep reading or Jump to: top ⬆ of post | MEETING PREP | IN THE MEETING | TROUBLESHOOTING ISSUES | ASKING FOR HELP
In the Meeting
In Meeting Controls, Meeting Chat, Keyboard Shortcuts, How Do I…?
If you followed all of the steps to log in through the web, your browser window should look a bit like this:
Microsoft Teams Web Browser Guest User Interface with labels and explanations.
You will notice a few distinct differences from the Teams application.
In Meeting Controls
If you are used to using the native application, you may be looking for it in the top of your window. In the browser version, the control bar will be in the lower third of your screen and will automatically hide if your mouse is not hovering over it.
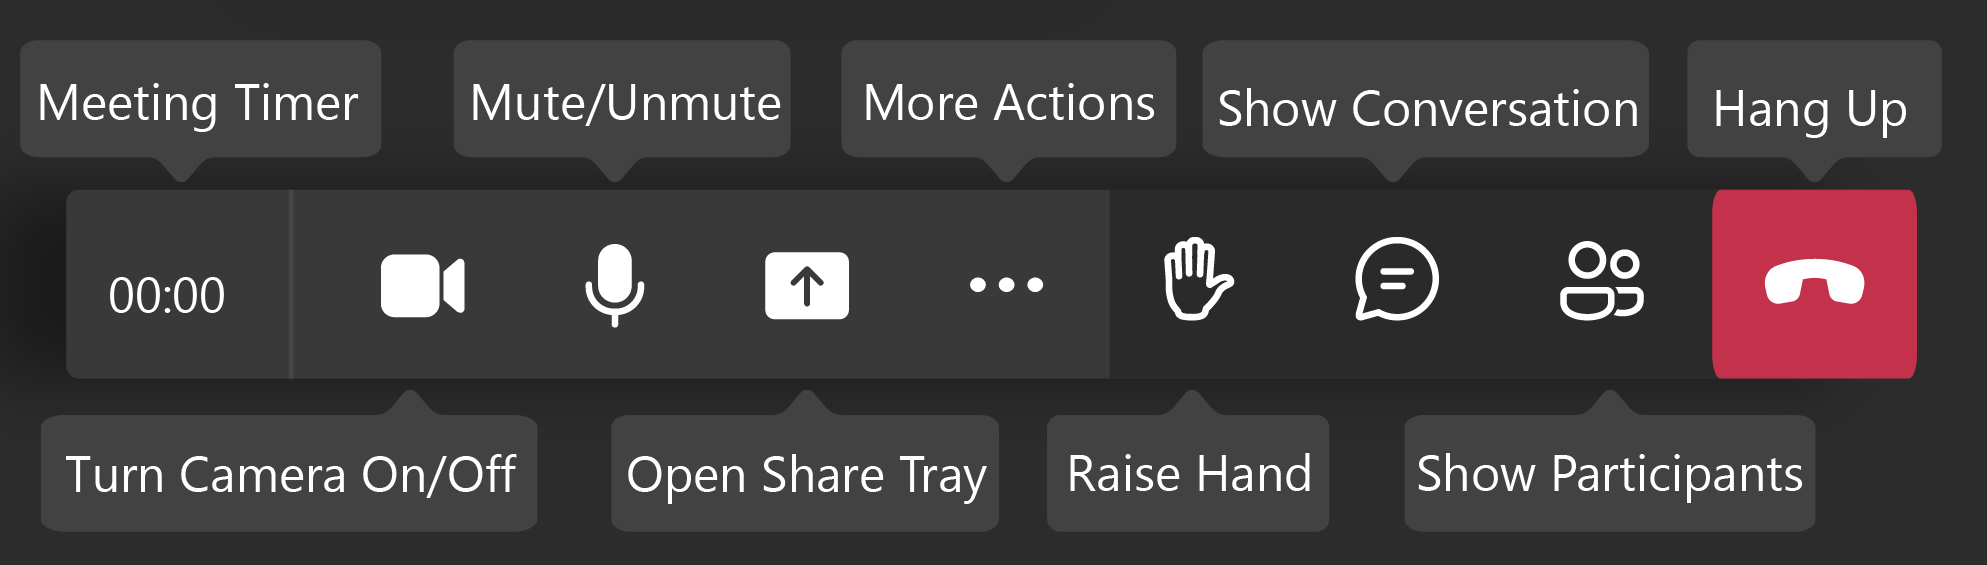
Teams Browser version control bar with labels.
The controls, explained (left to right).
Timer. On the far left of the control bar is the meeting timer, this shows you the running time of the meeting. Hovering over this will show you the meeting name.
Camera icon. The camera icon controls whether or not your camera feed is turned on (transmitting your live video data and allowing other participants to see you) or off (not transmitting video data to other participants in the meeting). When the camera is turned on, the control bar will display a white, filled in icon (as above). When the camera is turned off, the control bar will show the same icon with a line through it.
Microphone icon. The microphone icon controls whether or not your microphone feed is turned on (unmuted and, transmitting sound data that allows other participants to hear you) or off (muted, not transmitting sound data to other participants in the meeting). When the microphone is unmuted, the control bar will display a white, filled in icon (as above). When the microphone is muted, the control bar will show the same icon with a line through it.
Share Icon. The icon with a rounded rectangle and arrow is the “Open share tray” function. If enabled, allows participants to share their computer screen for their own presentations or to provide a real time view for technical support. When this option is selected, and a participant is transmitting their screen data, the control bar will display a box with an x in the middle of it.
Three horizontal dots (More actions). Selecting the three dots will open up a menu of additional in-meeting controls, explained in greater detail below.
Raise hand. The raise hand icon will raise your virtual hand. When your hand is raised, the icon will be filled in. Functionally, this gives the facilitators and other participants a visual cue that you have a question or comment. Clicking the icon again will “lower” your hand and clear the visual cue and notification for the facilitator and other participants.
Chat bubble (Show conversation). Clicking this icon will open or close the meeting chat to the right of your screen. This icon often only appears after chat has been engaged after you join.
Two users (Show participants). Clicking this icon will open or close a participant list to the right of your screen.
Red Phone Button (Hang Up). The red phone button will cause you to “leave” the meeting by closing your connection to the call.
⬇ Keep reading, or jump to to the top ⬆ of the post or meeting overview.
The More Actions Menu
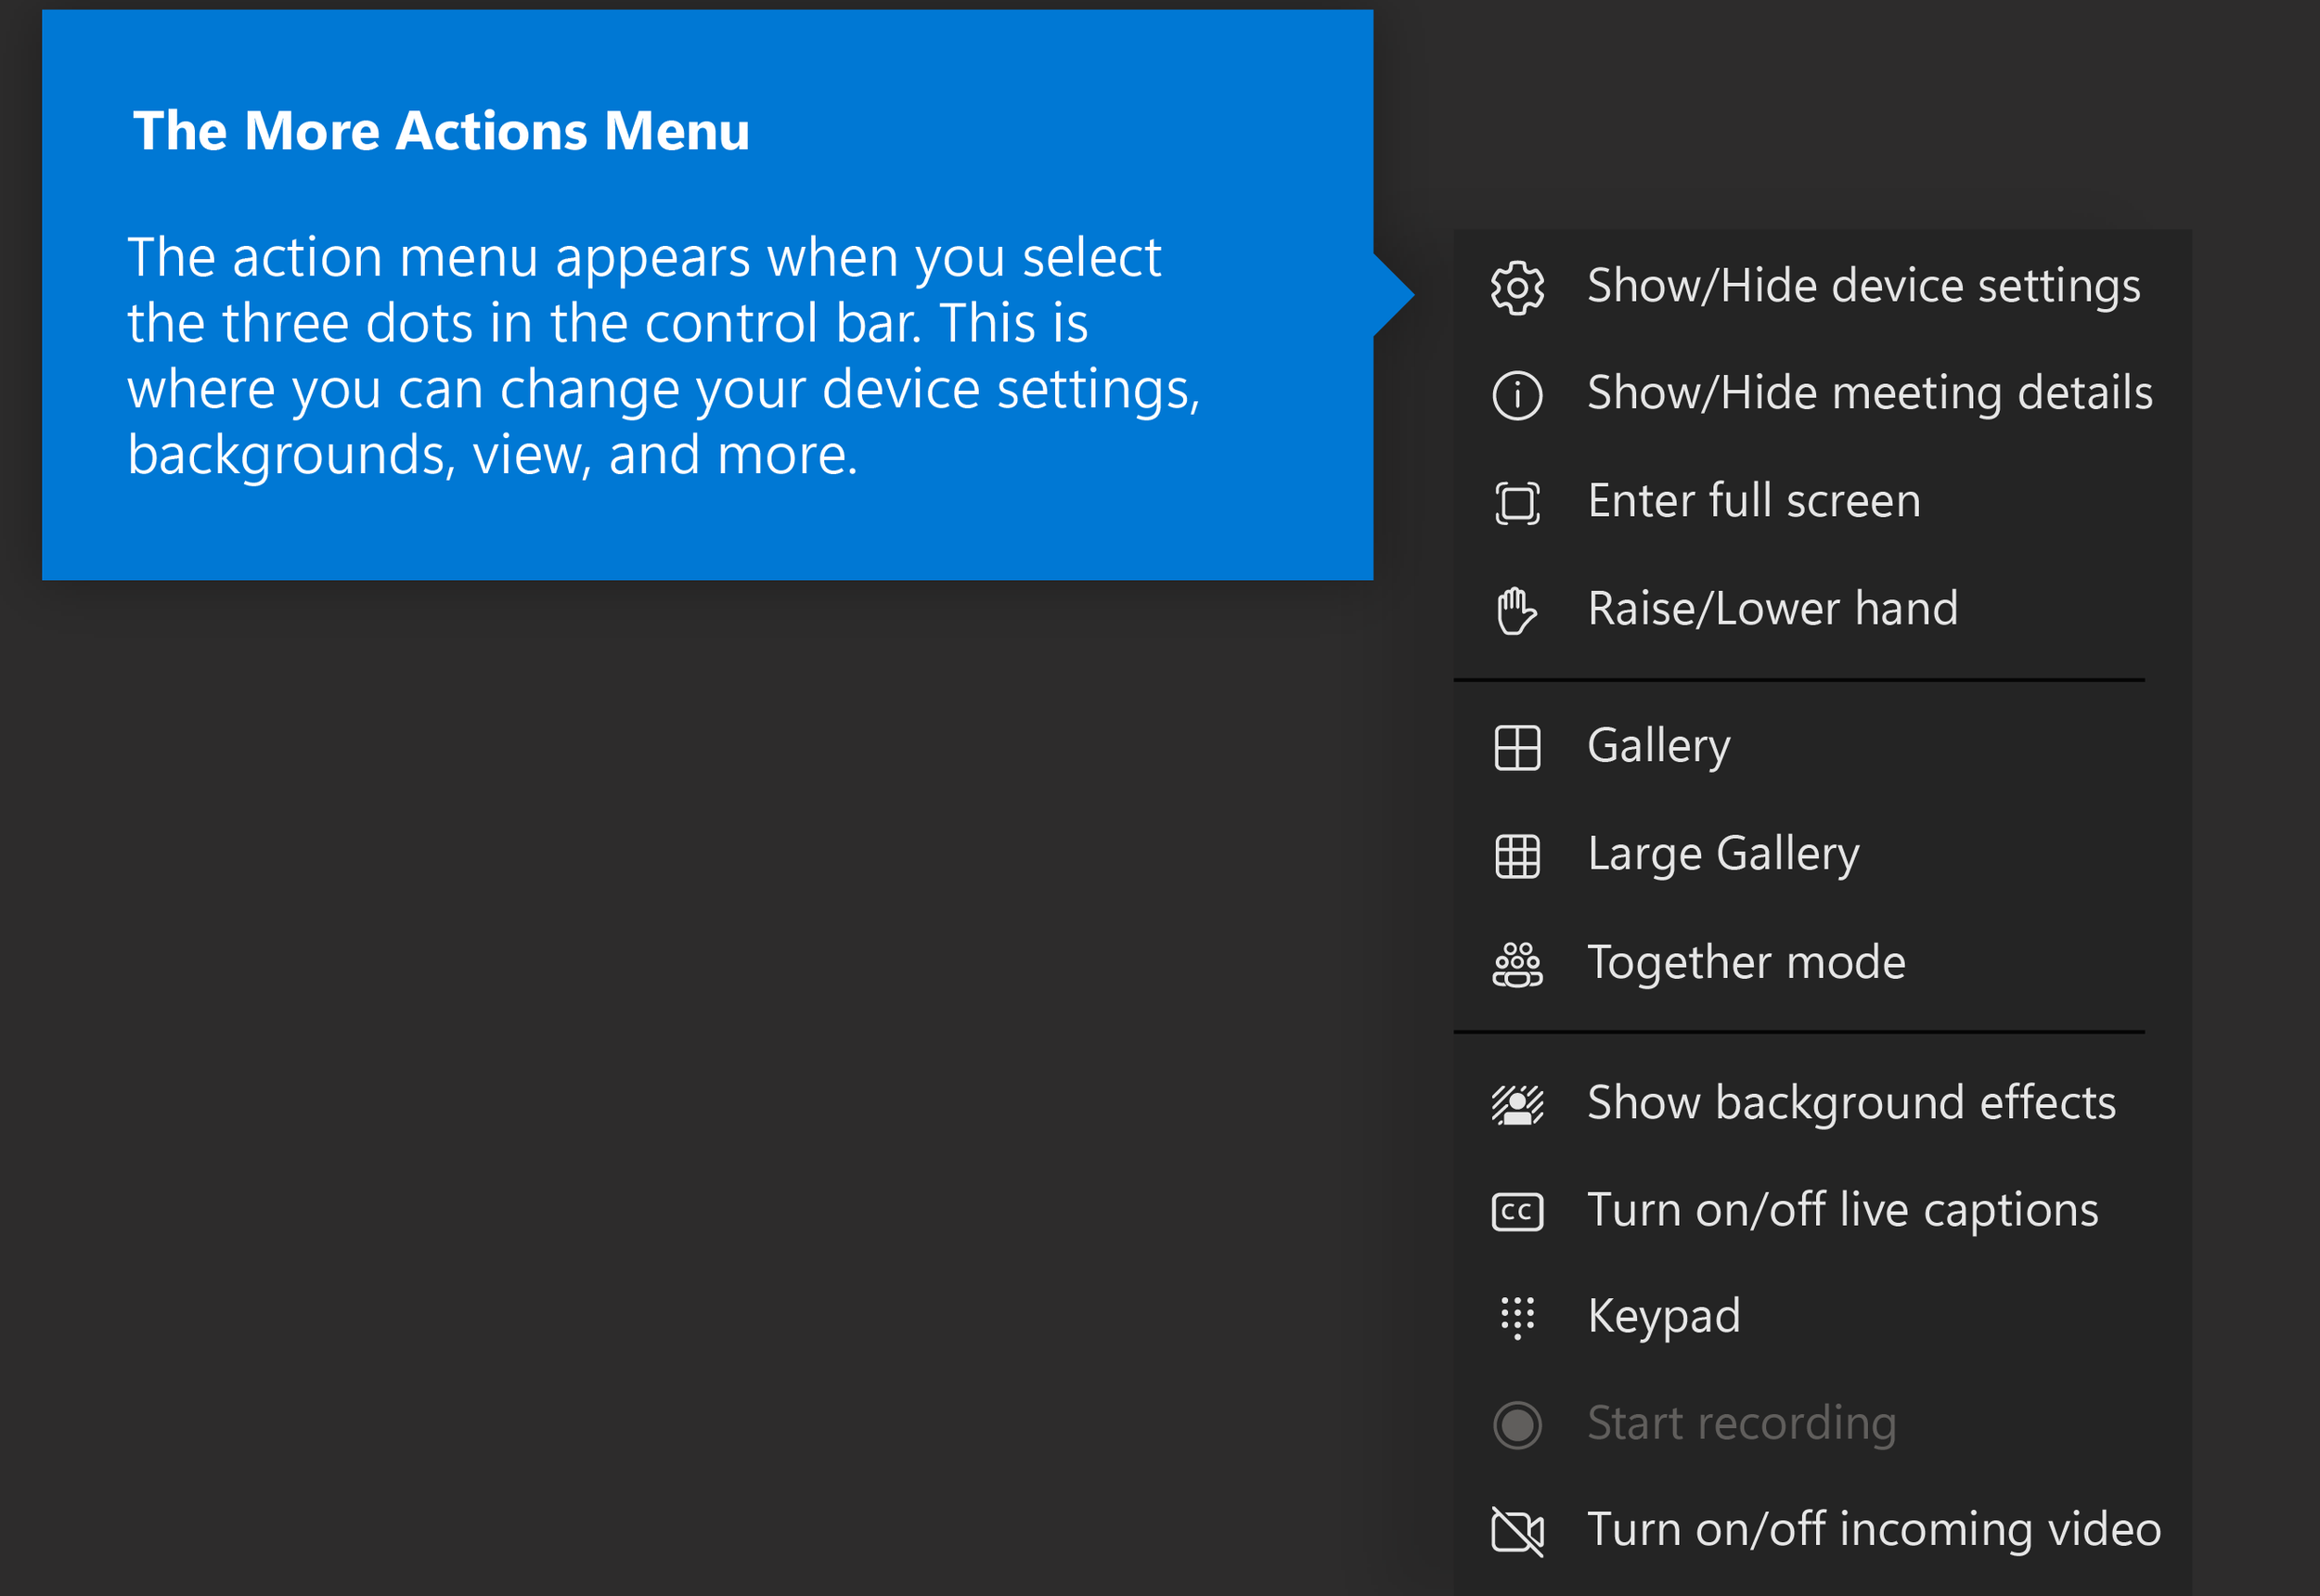
Teams Browser version More Actions menu
-
Clicking “Show device settings” will open up a menu on the right side of the page. This menu gives users the ability to change or confirm the selection of their desired audio devices, speaker, microphone, and camera. When this option is selected, this menu option will read “hide device settings” and clicking it will make it close.
-
Clicking “show meeting details” will pull up the information for the meeting that you are in. This includes any description the organizer has included, call-in details (if available), and the meeting link. When this option is selected, this menu option will read “hide meeting details” and clicking it will make it close.
-
This option will “raise” your virtual hand. Functionally, this gives the facilitators and other participants a visual cue that you have a question or comment. When this option is selected, this menu option will read “lower hand” and clicking it will clear the visual cue and notification.
-
These three options all control the way that people appear on your screen. The “Gallery” will show larger participant videos, but less participants. The “Large Gallery” will show more participant videos, but they will be smaller. “Together mode” is an augmented reality function that will place the video feed of participants together on an image (like a classroom, theater, amphitheater, etc.) and takes more internet bandwidth to run successfully.
-
When selected, this brings up a menu on the right side of the screen that gives participants an in-meeting ability to turn on/off virtual backgrounds or background blur. Virtual backgrounds and background blur take up more internet bandwidth. When this option is selected, this menu option will read “Hide background effects” and clicking it will close the menu.
-
Selecting this option will turn on Microsoft Teams’ automatically generated closed captions. When this option is selected, this menu option will read “Turn off live captions” and clicking it will turn off the closed captions.
-
At this time, this feature has no function in Teams meetings on the web with Franklin IQ.
-
If enabled, this gives participants the ability to start a local recording of the meeting. This function is not available for participants for the majority of facilitated events with Franklin IQ.
-
Selecting this option will turn off the incoming video feed for all other participants. This is useful for participants who may have lower internet speeds or are consistently encountering errors.
⬇ Keep reading, or jump to to the top ⬆ of the post or meeting overview.
What Keyboard Shortcuts can I use?
Mute/Unmute by pressing ctrl + shift + m on a pc or ⌘ (cmd) + shift + m on a mac
Temporarily unmute ctrl + spacebar on a pc or ⌘ (cmd) + spacebar on a mac
Change browser tabs ctrl + tab or ctrl + pgdn (Press a number while holding that command to switch to a specific tab!)
Change windows or applications by pressing alt + tab or change screen layouts by pressing WIN + tab
Open the emoji keyboard by pressing win + . (period) on a PC or ⌘ (cmd) + ^ (ctrl) + space on a mac to pull up your system’s emoji keyboard.
⬇ Keep reading, or jump to to the top ⬆ of the post or meeting overview.
How do I…?
-
In the browser version, the control bar is found in the lower third of your screen on the web or at the top of your screen in the app.
When joining a meeting as a guest, the chat bubble will not appear until someone has said something new. Guests do not typically have access to meeting chat history.
Once the chat bubble is visible in your control bar, click to open the chat.
-
In the browser version, the control bar is found in the lower third of your screen on the web or at the top of your screen in the app.
Click the ellipsis to open up the menu. This should be two to three icons over from the phone button on the right.
Select the “show device settings” option with the gear icon (shown at the top of the menu, typically).
-
Many guests do not have access to meeting reactions in the browser version, particularly those coming from secured environments.
All guests will have the ability to raise/lower their virtual hand in the meeting by clicking the “✋” icon in the control bar.
Most guests find that they do not have access to emojis, gifs, or stickers natively in the web or guest version of the app.
You can press win + . (period) on a PC or ⌘ (cmd) + ^ (ctrl) + space on a mac to pull up your system’s emoji keyboard.
😔 You can type out “emoticons” or copy/paste the ascii ones like it’s 1999 :-)
Smiley face :-) or :) or ☺︎
Big smile :-D or :D
Laughing X-D or XD
Sad face :-( or :(
Heart <3 or ❤
Check ✔
Cheer ※\(^o^)/※
High Five ._.)/\(._.
Shrug ¯\_(ツ)_/¯
-
In the browser version, the control bar is found in the lower third of your screen on the web or at the top of your screen in the app.
Click the ellipsis to open up the menu. This should be two to three icons over from the phone button on the right.
Select the view that you prefer (gallery, large gallery, or together mode).
-
In the browser version, the control bar is found in the lower third of your screen on the web or at the top of your screen in the app.
Click the ellipsis to open up the menu. This should be two to three icons over from the phone button on the right.
Look in the menu for the “[CC] Turn on live captions” and select that option.
-
In the browser version, the control bar is found in the lower third of your screen on the web or at the top of your screen in the app.
Click the ellipsis to open up the menu. This should be two to three icons over from the phone button on the right.
Look for “Show Background Effects” and follow the onscreen prompts.
-
Please be advised: dialing in separately comes with limitations. Dial in participants are not currently able to be put into breakout rooms and Teams meeting guests joining from browsers currently do not have access to Teams’ “Call me” feature to tie their phone to their participant profile.
View the meeting details or request the call-in number in the chat.
Jump back to the meeting overview.
⬇ Keep reading or Jump to: top ⬆ of post | MEETING PREP | IN THE MEETING | TROUBLESHOOTING ISSUES | ASKING FOR HELP
Troubleshooting
Some common issues that Teams guests run into are:
Looping back into the main room after breakout rooms are opened
Unable to join breakout rooms
Loss of sound, video, or chat
Meeting suddenly closes
Unable to login
DIY Troubleshooting
Close all background operations & tabs not being used in class
Turn off background effects or even incoming video to improve connectivity
Make sure you are in Edge or Chrome, not the Teams App
Make sure your browser is up-to-date
Use a private browser window
Add Microsoft and Teams to your trusted/safe sites in Edge or Chrome if you are permitted to do so by your group policy
Triple check your device settings in the meeting and allow the browser tab to use your mic/speakers/camera
Clear your browser’s cache/cookies regularly
Fully shut down your computer, leave it off for 1 minute, and then restart
⬇ Keep reading or Jump to: top ⬆ of post | MEETING PREP | IN THE MEETING | TROUBLESHOOTING ISSUES | ASKING FOR HELP
Asking for Help
If you have tried all the steps we’ve listed, or you need help walking through, a Franklin IQ producer or your organization’s help desk may be able to help. Help the producer or support agent to help you by having the following information handy.
What Producers or Support Agents Need to Know to Help You Effectively:
What operating system you have, either the Windows & Version #, Mac OS & Version Name & Number (click the links to learn how to find your operating system) or the make/model of your mobile device or tablet.
Whether you are using a personal device or a device owned by your organization.
What windows, applications, and tabs are open. Check this by running Task Manager on a PC or Activity Monitor on a Mac.
The exact steps you took to come into the meeting
What window “has the focus” (or what the active window is).
On a PC, there will be a white outline around the program in the taskbar.
On a Mac, it is the program name that appears to the right of the Apple icon.
What troubleshooting steps you have tried.